New dilemmas and new questions, What kind of lenses do I wanted to have? The list was long, I wanted a telephoto lens, I wanted fast prime lenses, I was dreaming of everything, yes but which ones? Nikon, another brand less expensive like Tamron or Sigma? I really couldn’t tell and actually, even on the web I couldn’t find any help, as it happened before, too much information, in some blogs Tamron and Sigma were excellent lenses with attractive prices, while others were affirming exactly the opposite. For someone that was starting photography I was lost, so what I did? I looked for the only person I was trusting in, my “friend” John Greengo, in his course “Fundamentals of Photography” there was an entire chapter about objectives and lenses. Obviously, during the course Mr. Greengo is never telling which one you have to buy, however his advice was:
“Try to have the best lens possible taking to account price and quality, as your lens will be your eyes and your pictures will depend a lot on the quality of your lens”.
So, I translate it into this: if a good lens cost $ 1000 and the same of a less quality brand cost $100, I think that there could be problems or some lacks of quality somewhere in the cheapest one. So, as I decided to buy a good camera, I decided to invest in excellent lenses. The mission was a little bit trickier compared to when I bought my gear, because there were different kind of lenses with the same focal length from the same brand, so which one was the best compromise between price and quality? Even my friend Francesa could not help me, so I started to google for reviews, and I found someone awesome: Ken Rockwell. This guy is amazing, (I call his website my Photo-Bible) it’s the most useful site I have ever used. Ken reviewed so many lenses and cameras of multiple brands that I’m pretty sure you’ll find all the information that you need. So, My advice is, if you don’t know what lens to buy, and you don’t know anyone to help you, have a look at Ken rockwell website.
My firsts lens I bought was a 55 -200 mm and I paid 80€, I knew that It was not the sharpest lens on the market, but I was still learning, right? So, there were no scratches at all, it was working correctly, I could afford the price, I was totally happy! Finally, the total amount of my expenses were: 650€ for the gear (D5300) + my new lens. My bag had now two lenses: an 18-55 and the 55-200, and It was still cheaper compared to the shops prices.
So, my final piece of advice is to buy the best lenses you can. Lenses are important, but when you start you can always use old versions or second-hand ones and still reach your goals, learn, and continue to improve yourself!
Nowadays, when you are starting digital photography and you know barely nothing about it, choosing a camera can be quite tricky. There are thousands of articles, blogs posts and you tube videos that finally, when I had to buy mine, the more I was reading, the more I was watching videos, the more I was confused. So, what helped me? My best friend Fran who’s also passionate of photography. I remember she was using a Nikon D5000 and was completely fulfilled. So, started to ask myself, why that one? Why she chose that brand? So there I started, eliminating a lot of other brands and I circled down my choices to Canon or Nikon. That was the eternal and infinite dilemma, which one is the best? Really, I still don’t know, I think that both are good gears. I choose a Nikon, Why? Because my friend had one, she was really happy and I was counting on her to help me if I had questions.
TIP 1 – I’m sure you certainly have friends that already have a DSLR camera, ask them if you can borrow it, even just for an afternoon, or go shooting with them, so you can see if you like it, you can check the menu, and realise how do you feel about it.
Moreover, You can also ask them a piece of advice, why did they choose that camera? What they like about it? What they don’t like?. I love internet but sometimes is still easier to have a face to face talk with someone than reading dozen posts by yourself.
As, I was shooting with my dad old canon reflex camera, for me it wasn’t really a new thing buying a new gear, in a certain way knew what i would have liked to have, I just could decide between the different brands or models. Was a canon? A Nikon, A sony? Or something else? And what model? What was the difference between the nikon D5000 and D7000 serie? or Between the Nikon D and the Canon Mark I II or III? So, I started reading tons of blogs, and articles, comparing models within a same brand, and then comparing different brands. To simplify my quest I restricted my choice to a mirror camera from Canon or Nikon. As I was shooting with an old argentine, I didn’t know anything about full frame sensor or cropped ones, mirrorless, etc. So I asked again to my friend, and to people that were using digital DSLR camera, and I decided to look for a Nikon D5000 series.
Now, another big question, new or used one? That’ s a matter of chance, what I can say is that today there are many websites or groups of photography passionates where you can easily find good used gears in good conditions. I new that here in Belgium the prices for the last model of Nikon D5000 seire ( at the time was the Nikon D5300) was around € 600-750 depending on the lenses or other gadgets etc. The previous model Nikon D5200 was still available in shops and was a little cheaper, around €400-500. Now, budget is really important, so I fixed it at €500 for a new, but I decided to look for a used first.
TIP 2 – Always fix a budget, it will help you screening.
I Started to look for it during my trip in UK searching on www.gumtree.com (which is a great website) but all the camera I found were too far from us, so finally it didn’t worked. I didn’t trust eBay enough to buy it on their website, because there were no seller in Belgium and I wanted to check the camera before paying.
TIP 3 – If you want to buy a used camera, always check it and try it before buying it.
Talking again about budget, I thought that I could spend something around €300 for a second hand gear of Nikon D5000 series, so I fixed my used gear budget at €300-350. The two websites I searched for it were two local platform were Belgian people sells their goods www.kapaza.be and www.2ememain.be. Nice websites, I took different stuff there and I’ve never being deceived. So, each day I was screening the announces hoping for a good news and as soon as something interesting was there I contacted the person. However, I was surprised of how many people were looking for buying a camera and that the prices were a little bit higher than expected, (which actually was a good news but at the time I didn’t realise it). I was almost giving up and go buying a new one when, I finally read a message from someone selling his Nikon D5300 with a 18-55 mm lens, 6 months old, used only twice, still under warranty for 570€. That was a good occasion, the last model €200 cheaper compared to shops prices. I contacted the guy and asked why he was selling it.
TIP 4 – Always ask why the person is selling, it gives you interesting piece of information.
This seller wanted to buy a nikon 1 because he founded that the D5300 was too big and heavy to carry around, so he wanted to sell it fast because he was leaving for holiday the week after and would have liked to buy the other camera before leaving ( that’s the reason of the price). Obviously, I wasn’t the only one interested in his camera and I had to decide quickly, I really wanted that gear but at the same time it was almost of the double of my used camera budget, and I was feeling so guilty to spend all that money! I mean almost 600€ here in Brussels it can be a small apartment rent, a month of grocery store shopping for my family, taxes to pay, and I was spending all that money on a camera? Actually, it was my husband who convinced me telling me that yes it was a lot of money, but the gear was still under warranty, so if there were any problem It would have been easier compared to a 300€ one without any warranty at all. So, I called the guy and fixed a meeting. I went to his house a couple of days later, I was really excited, the camera was on the table with his original box and all the papers, we talked a little bit his wife served a tea and he asked me to try it. Well… I didn’t know what to do, actually my friend Fran during summer lent me his camera and I shoot a couple of pictures but I could not remember a clue about it … So, what? I took the camera in my hands I looked at it and I faked that I knew perfectly what I was doing. I checked that there were any scratches, and then he asked me, do you have a memory card, so you can try it? A memory card? Oh shit, I completely forgot that, so he gently put in one of his own and fired a couple of photos in his house to show me, the pictures were there and seemed fine, so I trusted him and bought it.
TIP 5 – If you do not know how to use a SLDR camera, and want to buy a used one, go test it with a friend who know how to do it.
TIP 6 – remember to bring a memory card.
That was quite an adventure and now if I had to do it again, I would go with someone that knew cameras and could check if it is really working well. Let’s say that I was lucky because I’ve never had any problems with that camera and I sold it later for €500 to someone else, so finally my first DSLR camera costed €70!
I’m a little bit late for this post because I’ve being working on some Photography courses & workshop that will available soon here in Brussels! Yep, I’m sooooo excited about that! However I think I’m still on time for giving you a few ideas for shooting some terrific Halloween images.
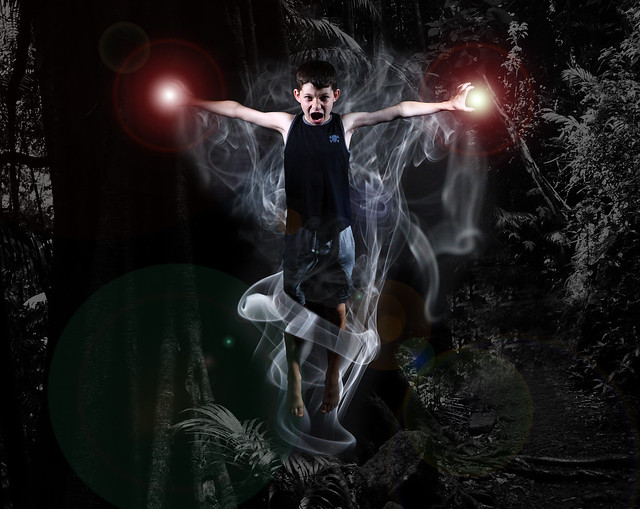
1 Levitation
Have you ever dreamt to be able to fly? Or to photogaph a flying person? I did, and actually with the correct moods levitation can transform a normal image into something creepy exactly what we like for Halloween. The first time I’ve seen those pictures I thought that it was the most difficult thing to do, but actually it isn’t. It’s obvious that you need patience, a nice locaiton, and a great composition (it’s not because you master your technique that your picture will be nice). In this levitation photography post, you’ll find videos tutorials you’ll find all the tips and explanations you need for your first trial and a bunch of inspiring images! So, once you have your theme (remeber that your pic has to tell a story to the people who are looking at it), don’t be afraid shoot and try, it’s just awesome!
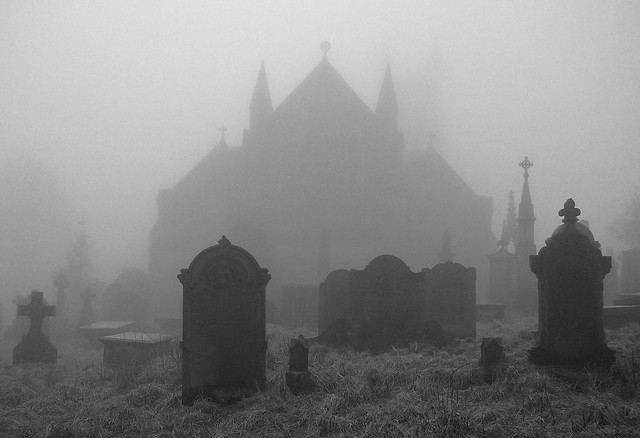
2. Fog
Fog, mysterious white, gray smoke that change immediately the feeling of any place, is something you can’t miss on Halloweed. Add it at your favourite location and you’ll have a complete different atmosphere. I understand that you can’t wait to have a foggy day to take your picture, that’s why there is a really easy way to add fog to your pictures using photoshop, and it’s very well explained in this 6 minutes photoshop tutorial, Photoshop: how to create realistic fog and mist. It’s really easy, so, just take your photos, open them in Photoshop, follow the tutorial step by step and you’ll gave a scary foggy image.
3. Light painting
Olives Jar Credits: Lucy J Hamilton 105 mm ISO: 100 f/4.5 30 sec
I think that light painting can be adapted to many occasions. Basically it depends what you are painting, imagine creepy old bloody masks, or broken dolls or anything that could tell a scary story. If you are new to light painting check this article I’ve posted, photography: light painting tips, you’ll find the direction needed to shoot in the dark, then just give freedom to your creativity and take the dark path and paint your most scariest images!
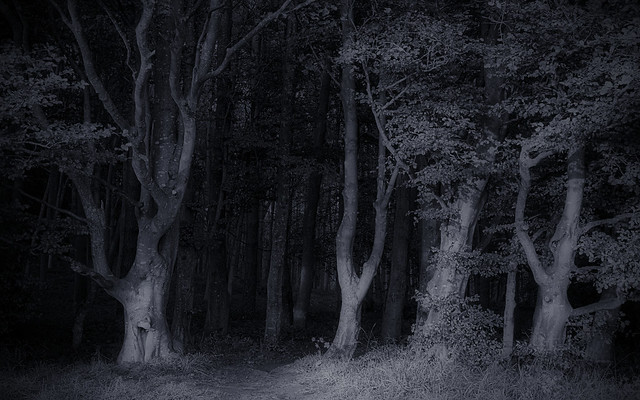
4. Night Photography
Isn’t night scary? everything change during the night, the shadows and sounds became suddenly creepy creatures that come from another world. So, go out after sunset, try to catch shadows, moods, look for mysterious locations, solitary houses, barns,empty shops, Look for images that will tell scaring stories. Ask to your friends to come with you, they could be perfect subsets for nights portraits!
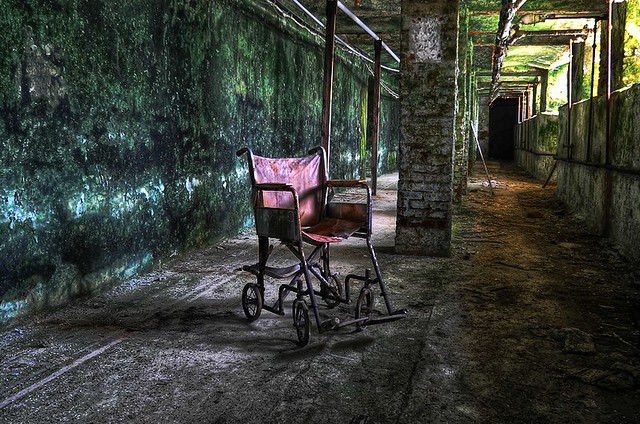
5. Urbex photography
Do you know any abandoned location near you? If not look for them, take a tour in your neighbourhood and look for those creepy abandoned houses that are waiting for being photographed. However please pay attention, there are a few rules to follow.
FIRST please pay attention! Abandoned buildings could be dangerous, even if fascinating, floors can be instables, walls could fall apart, so my advice is NEVERGO EXPLORING ALONE, be at least with a friend, or a couple of people.
SECOND choose you gear and one lenses (max two), take your tripod and go light, sometimes you’ll need to run, because there could be animals, or other people, or junkies, or maybe the place it’s just to small to pass through and you can’t have too much weight on you.
THIRD is not always legal, is not always possible to ask for permissions to enter into an abandoned place, so if you do not have permission but you’re about to get into a private doamin, please be careful, remember you are there to take pictures and not to ruin the place. Do not take anything away from the de site, do not leave garbage, respect your environment. If you really do not know where to go for your first Urban Exploration experience, or you don’t want to go alone and your friends don’t want to come with you, you’ll have here a list of nice websites that are sharing the locations and some communities that you can join.
If you are looking for some inspiration, Jonny Joo website is full of beautiful photographies that can help you.
So, the end of the month is almost there, are you ready for taking scaring terrifying halloween phtotos? Please do not hesitate to post them here, or on my Facebook page, I’ll be happy to see them and sharing them 😉
March is arrived and soon spring will be here and changing our environment with the beauty of green leaves, colourful flowers, jumping squirrels, later sunsets and early sunrises. But this month is a transitional month and here in Belgium we still have a winter decor with only early signs of changes. So, if you are looking for some inspiration you have here 5 Ideas to try in March:
I know this is not a new technique, but have you ever tried it? I have and I adored it! You can have great results even on small subjects, and this is my advice, if you are starting, start small, you’ll be astonished to see how different are everyday objects when you light paint them. You can shoot indoor, in your kitchen, living room, laundry room, bedroom, doesn’t matter or outdoor. Now, If you are outside, you should check the city lights, as you are shooting with a long exposure technique, your camera will catch all the sources of lights that surround you. It can be nice, or it can screw everything, all depends of what you want to photograph and how. With a 30s exposure time you can even have a nice starred sky behind your subject, if there are no other lights that pollute your place and that’s awesome! What do you need?:
A SLRCamera
A tripod
A source of light
Darkness
If you don’t know how to do light painting photography, or you want more tips, have a look here: Light Painting Tips.
I love long exposures, but usually I use them when photographing the sea, water, or if needed in my landscape photographies, so, basically with a tripod and a remote control . Last month I’ve met a photographer (Bones Tea) that uses long exposures hand holding his camera and takes urban photographies. I can say the result is really nice, people moving seem ghosts in a frenetic town. So, if you are tempted of trying this is a challenging technique as you really need to stay as still as possible keeping your breath when shooting. What do you need?:
An SLR camera
A neck strap
Your Time, your creativity, your curiosity, your art 🙂
How do you do it? First of all choose a place where there are people passing by, try underground stations, stations’ platforms, streets, zebra crossing etc. choose a place where you can stand motionless and shoot. The challenge is to find a good balance between your aperture and shutter speed. If you have nice coloured dresses, saturate the colours in postproduction, they will pop up in the movement, or at the contrary you convert your image to a black& white one and you’ll also have a really awesome effect. Settings: There is not a magic formula, as usually in photography, but as the aim is to have as many “ghosts” as possible, you can try with first setting your ISO to 100, then set your shutter speed as low as you can (it’s easier in the evening or at night, but you can do it also during daylight), you can go to 1minute, but 30 seconds is a good start. Once set that, get your aperture as open as you can, at daylight is very difficult as your images will be fast over-exposed, but you can play with the +/- exposure adjustments button and try to compensate. Your pictures will be really bright,so, I know that it is not an easy technique, but once you have the right combination, the results worth the many attempts!
Are you in Wildlife photography? I love all kind of animals but I don’t always have the possibility to travel and explore exotic regions where live colourful tropical birds, monkeys, bears, white bears, penguins etc. and sometimes it’s a kind of frustrating. However, it shouldn’t be, because if I ask my self today, “if you have now a tropical parrot in front of you, are you prepared and ready to take a beautiful shot?” The answer is: “Not really”, I think I would panic looking for the best settings not to screw my photo, and I’ll probably screw it. So, what can I do? Just get out and take fauna pictures in my region, where actually live different kind of birds, foxes, rabbits, roes/deers … What happens if I screw up? nothing because I can get go out and try again & again. And you know what? I feel that often we look into magazines and dream of far-off countries, and we don’t see the richness that we have just outside our door, we only need to open it, take a walk and observe. This is why I invite you to have a walk in your neighbourhood and look for birds, why in March? Because the trees are still without leaves ( at least here in Belgium) so, they are easier to be seen and to be taken in photos, and the temperatures are riding up, so, it’s less cold than the previous months. My Tips for this? Get well dressed because sometimes you have to stay in a place and wait for a long time, I mean that even if spring is coming you can get cold, and is really difficult to take pictures if you don’t feel confortable. What do you need:
A SLR Camera
A lot of patience
Maybe crumbs of bread, or a little bit of birds food, ( I know this is a little cheating, but sometimes if you really want to take a photo of that bird and you tried and could not, you can always spread a little bit of food, and wait them to come)
March is the first month of spring, and if we are talking of spring we can’t forget the snow drops & squills flowers that pop up during this month (here in Belgium) they can be white, or violet, and cover the ground with a perfumed flowered carpet. That’s can also be a good occasion to use macro photography and focus on their details, the vibration of their colours. Use your creativity and try to explore all the possible ways to photographs those delicate little spring flowers. My Tips for this? Go out as often as you can and check for them, because when they bloom they last 7-10 days and it’s better to photograph those beauty in their early days when they are at their best shapes and colours. What do you need:
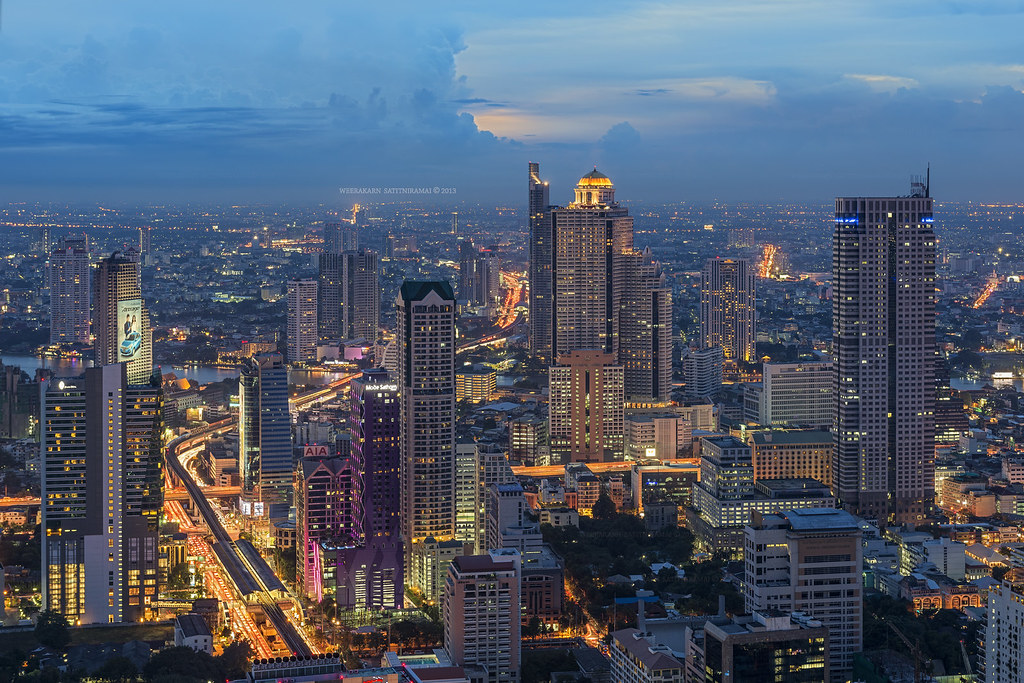
5. After Sunset City Photography We all love sunset, but look at this Bangkok Skyline here above, taken by Weerakarn Satitniramai, the camera catches colours that are invisible to our eyes with a fantastic blue sky. You can create amazing effects combining those blue colors with the city lights and passing cars. Pictures will be taken with a long exposure settings, and you’ll need a tripod to be sure you”ll have sharp beautiful images. My tips? Go scouting before, so you’ll be sure that you’ll be ready to take your picture at the right moment, without bothering people or traffic. Be there before the sunset, install your camera and maybe you’ll also have a nice sunset photo! Be patient and wait, because you have different stages of sunset:
Late warm dramatic southing light sunset
Sunset
Civil twilight / Alpine Glow: Sunset when sun it’s 6 degrees below the horizon, it lasts about 30 min after sunset ( depend your location on the Globe)
Nautical Twilight: It begins approximately 30 min after Sunset, and when the Sun is between 6 and 12 degrees below the horizon. It lasts t lasts about 30 min after sunset ( depend your location on the Globe) and planets & stars are visible. ( if you are taking urban pictures it will be difficult to see stars and planets because you have the city lights)
Astronomical Twilight: It begins approximately 1 hour after Sunset, and when the Sun is between 12 and 18 degrees below the horizon. It lasts t lasts about 30 min after sunset ( depend your location on the Globe). The camera still show colours with long exposures settings, but the naked eye can’t see any colour in the sky only the stars.
While writing the “5 Photography Ideas to try in March” post, I realised that light painting needed a full post for itself. So, I wrote this one dedicated to it. Enjoy!
What do you need?
A SLR camera
A source of light, anything can be used, the effects will be different, so, try and see what happens: -flashlights – led- mobile phones – computers- candles etc.
A subject: if you are starting with photography, or if you gave a small source of light choose something small. Check out in your home: cutlery, plants, books, jars full of food, or coloured liquid, kids toys etc. Take the challenge to give another look and to create another dimension to your chosen object with the light. If you have time, or you want to go and try outdoor, then again anything could be taken as subject, trees, farms, barns, cars, rocks, even parts or details of something, like a wheel of a bicycle or only a part of a car.
A red lamp , why? Because you’ll work in the dark and you need a source of light for put your setting on your camera, and for avoiding to stumble in your tripod. You can use a normal led / white light, but the human eyes accustom faster to the dark when using a red light and, it’ll then be easier for you to look back in your camera and focus. So, if you have one, use it, if not, don’t worry, just use another light and be a little more patient with your view.
A tripod, really important, you’re using long exposures and you don’t want blurry photos do you?
A remote shutter release /cable shutter release, same reason we wants to avoid any source of vibration.
Your Time, your creativity, your curiosity, your art
A white paper (optional): it can bee a white sheet of paper, a paper towel, a tissue, or even a white piece of fabric, anything that you can place in front of your lamp, maybe it won’t be necessary but sometimes the light is too strong or too direct, and putting something white on your lamp helps you to soft your light ( and why not trying something coloured?).
A tube (optional): ca be a toilet paper roll, a paper towel one or can be made with a piece of cardboard that you’ve cut and rolled around your flashlight and attached with tape or elastics, again, this is only to modify your light bump, you’re not obliged to do it, but you can try to see the effects.
Here is what I used for taking the photos for this post:
My camera, a tripod, a paper towel tube, a white paper towel, an elastic and a led flashlight.
How do I light paint?
Once your settings are set and you have pushed on your shutter release, as its name suggest, you have to paint with your light source like if you were holding a real paint brush. try to reveal the colours and the texture of your subject (for this try different angles, you’ll have more textures with a 90° light ray than with a vertical one). Be sure you’re not too close to your subject or into the field. Don’t stop moving with your light, or you’ll have spots ( except if that is what you’re trying to do). If you’re shooting indoor it is easier as you can adjust your focus with the light on and then just which it off and start painting. Place your subject on a table, or wherever you want to photograph it (even furniture can be great when light painted), and shoot! If you are outdoor, you probably scouted the place before, and my advice is: if possible go there before sunset, place your camera, focus and wait. If is not possible, pay attention when installing your equipment in the dark, then light up your subject, set your camera and shoot! Just three more tips: 1. if you can, close your viewfinder to not accidentally pollute with light the sensor, and 2. remember to switch off your VR option, if you have one on your lens, to avoid vibrations when shooting on a tripod and the last but not the least 3. Pay attention to reflects if you choose to use a glass subject, it can be tricky!
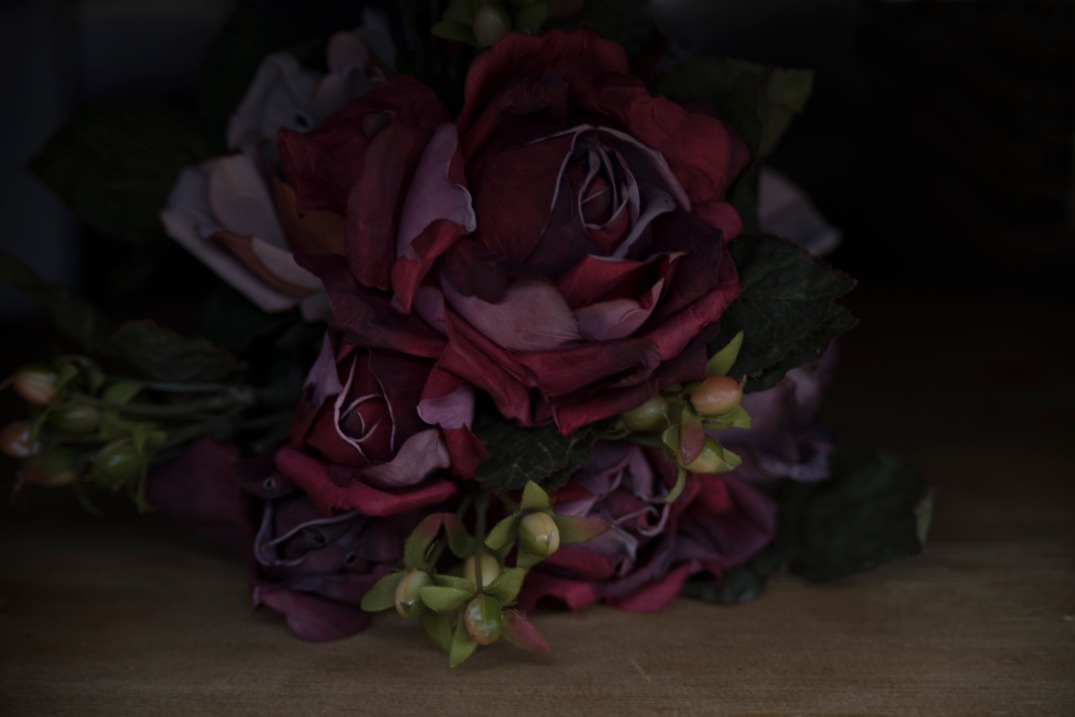
Settings: If you are indoor or outdoor, settings are almost the same, and as usual you have to try different combinations until you get the right balance for a nice sharp image. ISO: try to keep your Iso as low as possible, I always try not to go ove 500. The reason is the noise, every camera has his limits, and today you can easily get rid of noise with Lightroom or DXO, or other softwares, but I prefer to have less work with postproduction. Shutter speed: you can play with it, at the moment I’ve never get over 30 seconds, and for what I’m doing is large enough. The speed depends on the subject you’re photographing, the effect you want to have and where are you situated. If indoor, with small objects, you cas easily try 5s 10s 15s and even 30s. If you are outdoor, it’s the same, it depends on what you desire to obtain, but if you want a nice starred sky in your composition, then I think you should use the 15s / 30s exposition. In this last situation, remember to check the sunset stages, so your pictures will also have great coloured starred skies ( you’ll have a hint in my post 5 Photography Ideas to try in March under : 5. After Sunset City Photography ). If you take a look at the photo here below, you’ll see that’s a different picture compared to the first one at the top of this post, even if the subject is the same, we have 2 different dimensions, colours and atmosphere. Both photographies haven’t been retouched, the only difference is the shutter speed settings on the camera.
Aperture: Vary the aperture within the context, what focal lens are you using? Are you near/far from your subject? It’s a small/big subject? Do you want some shallowness in your composition? It’s obvious that you can’t use a close aperture, as you need to catch as much as light as possible, I think that the max you can go will be a f8, but again there is no formula, the only way is try try & try again. What if you decide to photograph a person, or any other living creature? No problem, you just have a more challenging picture to take. it’s really difficult not to move in long exposures photographies for a living subject, so a good piece of advice I can give you ( I read it in Dave Black‘s Blog) is to start painting the faces, so you’ll be sure that their expressions, will be as sharp as possible. Voilà, as we say in French, I think I’ve told you everything I know about light painting, I hope you’ll find it useful, and as usual, be free to post your photos, and your comments!


 Moreover, You can also ask them a piece of advice, why did they choose that camera? What they like about it? What they don’t like?. I love internet but sometimes is still easier to have a face to face talk with someone than reading dozen posts by yourself.

![Photographer Levitation 096/365 [explore #458]](https://farm6.staticflickr.com/5147/5596686437_0b5959f2b1_z.jpg)